{
"cells": [
{
"cell_type": "markdown",
"metadata": {},
"source": [
"\n",
"\n",
"[Table of Contents](0_Table_of_Contents.ipynb)\n",
"\n",
"# Chapter 8: Module 5 - Navigating KITT and Final Challenges \n",
"\n",
"**Contents:**\n",
"* [Define The Problem](#define-the-problem)\n",
"* [Obstacle Avoidance](#obstacle-avoidance)\n",
"* [Putting it all together](#putting-it-all-together)\n",
"* [Final Challenge](#final-challenge)\n",
"* [Final report](#final-report)\n",
"* [Final Presentation and discussion](#final-presentation-and-discussion)"
]
},
{
"cell_type": "markdown",
"metadata": {},
"source": [
"\n",
"\n",
"This chapter contains information that you will need when preparing for the second part: the final challenge. The ultimate goal is to let KITT drive from an initial (known) location A to a given target location B. In this final challenge you are on your own and no explicit steps are provided to help you through the process. Nevertheless, a few hints are given in this chapter on how you could attack the problem (but many alternative solution approaches exist).\n",
"\n"
]
},
{
"cell_type": "markdown",
"metadata": {},
"source": [
"## Define the problem\n",
"\n",
"> **The problem can be described as:** Write a Python program for KITT that enables autonomous driving from a given starting point A to a designated target point B. The car state in point A is known.\n"
]
},
{
"cell_type": "markdown",
"metadata": {},
"source": [
" As target accuracy, aim to arrive at B within a distance of 30 cm (measured from the center of the beacon). For the moment, you can assume there are no obstacles in the field, and that point B is reachable without driving off the field or needing to drive backwards. Once you have mastered to drive from A to B, extend your solution to drive to a third point C as well. This is essentially the same, except that the initial state (at B) is only approximately known, and depending on how you arrived at B, you might not be able to make the turn to C within the field boundaries."
]
},
{
"cell_type": "markdown",
"metadata": {},
"source": [
"### What information is important?\n",
"\n",
"1. At the starting point, you know both the car's position and its orientation. This is your initial condition. At location A, this information is accurate, but after driving for some time, it is approximate.\n",
"2. The target location is known, as it is provided. However, the car's orientation upon reaching the target is arbitrary.\n",
"3. You have created an algorithm to estimate the car's location, providing an estimate based on the moment the recording was made. However, keep in mind that the car may have moved while the recordings are being processed (unless you stop the car while localizing it). You also do not know the car's orientation. How can it be estimated? (Taking the difference of two positions is not accurate if you are making a turn, or if the positions are close to each other and both inaccurate.)\n",
"4. You have developed a virtual car model. You can use it in three ways: \n",
" - Track your current position and orientation (give the model the same commands as you give to your real car); \n",
" - Determine which commands should be given to reach the destination.\n",
" - Debug your algorithms: instead of testing on the real car, first test using the model."
]
},
{
"cell_type": "markdown",
"metadata": {},
"source": [
"### What do you need to make ? \n",
"\n",
"1. **Path planning:** You need to determine a path from point A to point B, which would ideally be a straight line. However, keep in mind that KITT has a specific orientation, and you can’t move or turn it exactly as you wish. The path to B is typically a circle followed by a straight line. You could choose to use a circle with a small diameter, and stop turning when the car is headed into the right direction. Alternatively, you could calculate a wide circle such that no straight driving is needed. \n",
"In both cases, you must calculate how long you want to drive on the intended circle (which depends on your selected velocity as well).\n",
"\n",
"2. **Path Following:** After defining a path, you need to give commands for the car to stay on the path. The way you do this will vary based on your strategy. E.g., at any new position, you could recalculate your optimal path (drive on a small circle, etc), or you can estimate an error and do error feedback. You will see examples of this in a later course (EE2S2 Systems and Control). A simple technique is to define the error as the difference in the current orientation angle and the angle of the direct line towards the target, and apply proportional error feedback: a larger error gives a larger steering action. You will have to worry about stability.\n",
"\n",
"3. **Location estimation** As you may have already noticed, having a path and a controller alone can make it seem like the TDOA-based localization function is unnecessary. However, relying solely on a path and a path-following mechanism (i.e., your virtual model) is essentially like driving blind, knowing only the start and end points (an open-loop controller). The model will allow you to drive for about 2 seconds and predict where you are, after that its accuracy is probably insufficient. Therefore, you will have to regularly estimate your position using the TDOA algorithm. The optimal blend of your TDOA-estimated position with the model-based position estimate requires more advanced control theory (Kalman filters) - this is a topic for the MSc. Some of this is presented in the [state tracking notebook](./state-tracking.ipynb). \n",
"\n",
"As a simple approach, you could update the state in your virtual model by the location estimates from the Location module once they become available. If you drive while estimating locations, then you should realize that that module will give your location from some time ago; a proper update takes that into account. \n",
"\n",
"For some guidance on how to plan your path or control the car, you could refer to the notebooks on [path planning](Path-planning.ipynb) and [control](Controller.ipynb). However, this material is readable only after you have done the course EE2S2 Systems and Control."
]
},
{
"cell_type": "markdown",
"metadata": {},
"source": [
"> **Note:**\n",
"> Keep in mind that path planning and path following don't necessarily have to be completely separated parts. \n",
"> The control system and path planning can be merged in simpler designs.\n"
]
},
{
"cell_type": "markdown",
"metadata": {},
"source": [
"### Defining your approach\n",
"\n",
"At this time it merits to brainstorm with your entire group on the approach\n",
"that you will take. For your selected approach, determine whether it will do the job (and under what assumptions/conditions). \n",
"\n",
"You can implement various strategies. The simplest is to move step by step: let the vehicle drive for 1 or 2 seconds, stop, estimate the location using the beacon, determine a control (= steering) action, and then continue moving. You won't really need your virtual model for this. At the other extreme, you could base yourself entirely on your car model. \n",
"\n",
"If you opt for localization while driving (obviously faster, much more realistic and comfortable for passengers), then you need a main loop that alternates localization with control. It would be nicer to do control continuously, while the localization function is regularly called e.g. using interrupts. In that case, the audio read function should probably be _non-blocking_, so that control can continue while the audio samples are collected. This will require next-level Python programming!"
]
},
{
"cell_type": "markdown",
"metadata": {},
"source": [
"> **Note 1:**\n",
"> You can opt for a simple and robust \"decision tree\" approach (i.e., based on many if-then-else statements), that will be able to handle the expected situations but not more than that, or a more thoughtful approach based on control theory, that is much more robust but also more difficult to implement. Note that decision trees are very hard to debug: for each if-then-else statement, you need to test both branches. \n",
"\n",
"> **Note 2:**\n",
"> This high-level system design is part of system engineering, i.e., with the entire system in mind, define an approach at a high level that will do the job, and define specifications of each constituting subsystem. These parts can then be designed by specialists that don’t have to know or consider the entire system. If the parts are tested and verified to meet their specifications, then the entire system is supposed to work. \n",
"\n",
"> For the current system, the hardest to specify are the timing conditions. E.g., if you specify a function that returns your state (position, orientation, velocity) from two past location estimates, then keep in mind that simple approaches will not give you the orientation and velocity at the current time, but at some time ago. "
]
},
{
"cell_type": "markdown",
"metadata": {},
"source": [
"\n",
"\n",
"\n",
"**Deliverable**\n",
"\n",
"In your final report, document your selected approach, and the alternatives that you considered, plus your\n",
"motivation for the selection.\n",
"\n",
"Document the foreseen consequences of this choice. Draw a block scheme that shows what software\n",
"blocks should interact, and define the interaction (e.g., variables).\n",
"\n",
"Your solution will probably contain a finite state machine and/or a loop. An important consideration is\n",
"the timing of this loop. Document your analysis of this in sufficient detail. How often do you intend to\n",
"measure your location, keeping in mind the constraints and trade-offs? Consider also the various\n",
"delays in the system. If you obtain a location fix, how old is that information? If you estimate velocity\n",
"from two locations, then to what time point does that velocity refer? How fast should one iteration of the\n",
"loop be? (If it is too fast, then you won’t have new location information, but if it is too slow, then you\n",
"might miss your target.) Can you merge location fixes from the audio beacon with predictions of your\n",
"position using your car model?\n",
"\n",
"The text on this in your final report can be placed into an initial section “Problem definition and analysis”, or “Problem analysis and high-level design”, depending on how you want to organize your report. Alternatively, it can be placed after the localization and car modeling sections, if you need to use information from those sections.\n",
"\n",
"In the final report, document your path planning solution. Illustrate this with examples of generated routes under varying conditions. You can use your car model to debug your algorithms!\n"
]
},
{
"cell_type": "markdown",
"metadata": {},
"source": [
"## Obstacle avoidance\n",
"\n",
"After you are able to confidently drive from A to B to C (etc), you can try the next challenge: obstacle avoidance. In its generality, this is an advanced topic.\n",
"\n",
"You have the parking sensors to help you detect obstacles, and also the perimeter of the field can be considered an (invisible) obstacle. Once you detect an obstacle, you need to steer around it. You can have the following options:\n",
"\n",
"- The most structured approach is to create a map of the environment. For example, you can store a 2D grid as an array, which serves as occupancy map. In this grid, any locations where obstacles are detected are marked with a value of 1, indicating that no path can be planned through those areas. When an obstacle is encountered, you halt and generate a new path from your current position to the target, factoring in the updated map.\n",
" \n",
" 📝 **Note:** Making a map is probably most complete approach, but it is difficult and time-consuming.\n",
"\n",
"- Instead, a simple approach is to define a new planned trajectory around the obstacle (possibly requiring driving backwards and then making a wide circle). Typically, students follow a *decision tree approach*: lots of if-then-else statements. When driving backwards, you risk driving off the field.\n",
"\n",
" 📝 **Note:** A decision tree works in simple cases, but the disadvantage is that it is hard to debug, and the solutions are often not general.\n",
"\n",
"- Study control literature on obstacle avoidance that use *artificial potential fields*. This is a general approach that essentially defines a penalty function around obstacles and then finds optimal trajectories that minimize the \"cost\".\n",
"\n",
"📝 **Note:** You can find some advice on this in the [notebook on obstacle avoidance](./obstacle.ipynb). More complex approaches rely on control theory, which will be covered in later courses.\n",
"\n",
"Here is a summary of these suggestions: "
]
},
{
"cell_type": "markdown",
"metadata": {},
"source": [
"### Obstacle avoidance options\n",
"\n",
"| **Approach** | **Advantage** | **Disadvantage** |\n",
"|-------------------------------------|-----------------------------------------------------|-----------------------------------------------------|\n",
"| **Create a map of the environment** | Most complete and accurate approach. | Difficult and time-consuming to implement. |\n",
"| **Decision tree approach** | Simple and works well in basic situations. | Hard to debug and not generalizable for complex cases. |\n",
"| **Artificial potential fields or other control algorithms** | General approach that can handle complex scenarios. | More advanced and requires control theory knowledge. |\n"
]
},
{
"cell_type": "markdown",
"metadata": {},
"source": [
"## Putting it all together \n",
"\n",
"Before you can start with the integration part, it is necessary to\n",
"have completed all the previous subsystems. \n",
"To link these parts together, you must communicate with the complete group about the responsibilities. The assignment during system integration is to complete the big final design such that you can complete the challenges. Read this chapter completely to know what they are.\n",
"\n",
"Focus on the basic challenges first. Once these have been implemented, you can work on the obstacle avoidance and anti-collision system. \n",
"\n",
"Take it step-by-step, and keep it simple and structured. You'll quickly reach a level where the car shows unexpected behavior and nobody understands why. You can only manage that if each subgroup delivers fully tested functions and subsystems. \n",
"\n",
"For the control system, you can choose to plan a route but you are not required to do so. Important to note is that the location estimates from the locating algorithm must be taken into account during the challenge as the integration of these two is the central focus of the system. \n",
"\n",
"When integrating the control system with the locating algorithm, it is important keep in mind the time it takes to run your control loop after each locating attempt and consider how you can ensure that you always record a full beacon waveform. Ideally, you drive your car while estimating locations. If necessary, it is permitted to stop the car while measuring. This is much easier to program, but you certainly won't be competing for speed that way.\n",
"\n",
"After you have completed the integration of the control and locating algorithm, you can attempt an implementation of the obstacle detection and avoidance system for challenges C and D. \n",
"\n",
"If you have time, we recommend to design a GUI; see the figure below for an example. This will facilitate to enter parameters for each challenge, and help you to keep an overview on what's going on. But if you have a tight control loop, you'll have to watch out that updating the graphics is not taking too much time.\n",
"\n",
"Since you have a virtual car model, you could also use a switch and have the virtual car drive the track, so that you can test the control and obstacle detection performance on those moments that the real field is not available.\n",
"\n",
"Do not postpone to document your work. The final report is needed very shortly after the demonstrations.\n"
]
},
{
"cell_type": "markdown",
"metadata": {},
"source": [
"> 📘 **Suggested workflow:**\n",
"> \n",
"> 1. **Complete all subsystems** before starting integration.\n",
"> 2. **Communicate** with the group to assign responsibilities.\n",
"> 3. Focus on **basic challenges** first.\n",
"> 4. **Integrate the control system** with the locating algorithm, ensuring real-time performance.\n",
"> 5. Consider **stopping the car** during measurements for simplicity.\n",
"> 6. Once basic integration is done, implement **obstacle detection** for advanced challenges.\n",
"> 7. If time permits, create a **GUI** for parameter management.\n",
"> 8. Test the system using the **virtual car model** when real testing isn't possible.\n",
"> 9. **Document** your work as you progress."
]
},
{
"cell_type": "markdown",
"metadata": {},
"source": [
"## Final challenge\n",
"\n",
"The final challenge for IP3 consists of four challenges and a fifth \"free challenge\". In order to get a passing grade, you have to successfully pass at least the first challenge. With every other challenge you pass you will get a higher grade. You will have maximum two attempts for each challenge. If you fail a challenge, you may not compete in further challenges, except for the \"free challenge\".\n",
"\n",
"The car reference position is the beacon location.\n",
"Before each challenge you are allowed to measure the field and the position of the destination (and waypoints). A challenge starts at a given (known) starting position at the edge of the field. The orientation of KITT is always 90° with respect to the edge of the field. Once the start command has been issued you may not touch KITT nor the PC except for an emergency stop.\n",
"\n",
"KITT may stop everywhere and as many times as needed. There is no time limit except for the fact that everything, including preparation and cleaning up, should happen within $30$ minutes. Needless to say, you must use the audio beacon for locating KITT, and the ultrasonic sensors for obstacle detection (no \"open loop\" solutions allowed).\n",
"\n",
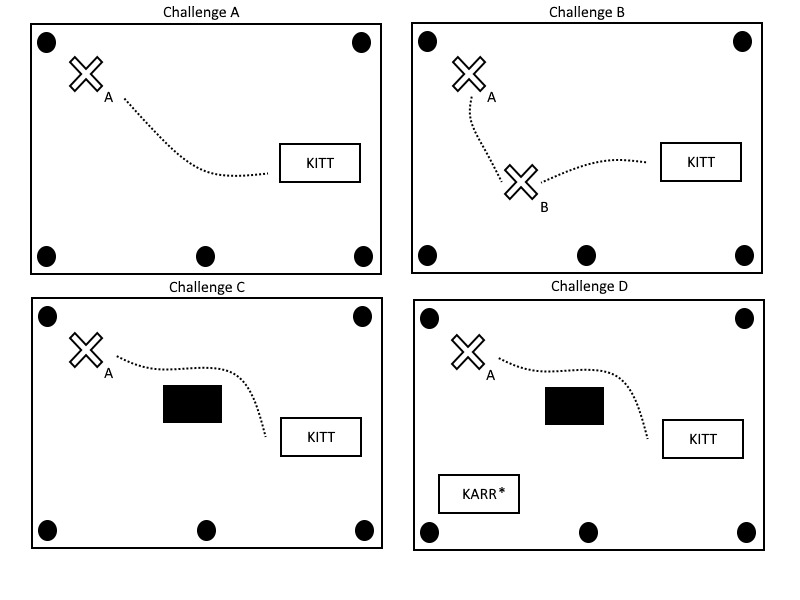
"**Challenge A** (65 points)\n",
"- KITT drives from the starting position to a specific point A in the field.\n",
" \n",
"- Once KITT reaches the destination it must stop and the PC must give a signal.\n",
"\n",
"**Challenge B** (10 points)\n",
"- KITT drives from the starting position to point A via another point B in the field.\n",
"- When KITT reaches the waypoint (B) the examiner must have the time to measure the distance; you should let the car stop for 10 seconds. \n",
"- When KITT reaches the destination (A) it must stop and the PC must give a signal.\n",
"\n",
"**Challenge C** (10 points)\n",
"- KITT drives from the starting position to a specific point A in the field.\n",
"- When KITT reaches the destination (A) it must stop and the PC must give a signal.\n",
"- There is an obstacle on route (two paper bins on top of each other) that has to be avoided.\n",
"- When KITT sees the obstacle, its position must be remembered.\n",
"\n",
"**Challenge D** (8 points)\n",
"- KITT drives from the starting position to a specific point A in the field.\n",
"- When KITT reaches the destination it must stop and the PC must give the signal.\n",
"- There is another car involved (stationary but with working beacon), this car has to be avoided. \n",
"\n",
"**Free challenge** (7 points)\n",
"- Invent your own challenge and impress us! For example, drive form A to B to C where after B you will need to drive backwards to make the turn.\n",
"- Points awarded depending on the difficulty and creativity of the task.\n",
"\n",
"**Grading**\n",
"\n",
"- If you complete each task perfectly you receive the total amount of points. Penalty points are deducted for missing the target or hitting the obstacle. \n",
"\n",
"ℹ️ The grading for a task cannot be negative. \n",
"\n",
"- The measurements are done with respect to the center of the louspeaker on top of KITT. \n",
"\n",
"- In *Challenge A* you may miss the destination by $30$ cm but for every additional $10$ cm you will lose $5$ points. You can't lose more than $15$ points.\n",
"\n",
"- In *Challenges B-D* you may miss the targets by $30$ cm and for every additional $10$ cm you will lose $2.5$ points, this holds for both the way point and the destination.\n",
"\n",
"- For each time KITT hits an obstacle or another car you will lose $2.5$ points.\n",
"\n",
"**Bonus:** The time you take to complete the challenges will be measured. The fastest team will receive 10 bonus points and the second fastest will receive 5 bonus points. \n",
"\n",
"ℹ️ It is not possible to receive more than 100 points for the whole competition.\n",
"\n",
"The figure below is a example depiction of the Challenges (*On the old television series, KARR is the archenemy of KITT*)\n",
"\n",
"\n",
"\n",
"\n"
]
},
{
"cell_type": "markdown",
"metadata": {},
"source": [
"## Final report\n",
"\n",
" Instructions for the final report are similar to those of the midterm report (see Mid-term report chapter). Aim for a **well-structured**, compact yet complete report of about 30 pages (plus Python code in an appendix). Do not forget to systematically report on testing/verification: how do you test (each subsystem, and the entire system), what are the results from the test, what do you conclude. Include the results of the final challenge in the report as well. Note that the final challenge is not a test, rather it is a demonstration. With extensive testing, these results won't be a surprise to the reader!\n",
" \n",
"The report is judged by committee members that are not indepth familiar with IP3, or the manual. Your report has to be sufficiently self-contained.\n",
" \n",
"The submission deadline is listed on Brightspace, typically it is one day after the final challenge. Submit your report using the corresponding submission folder.\n",
"\n",
"## Final presentation and discussion\n",
"\n",
" In week 10 (consult Brightspace for the exact date), you present and defend your final report in front of an examination committee. The examinators will ask questions about your design choices and aspects of teamwork. This will be part of your grade.\n",
"\n",
"The presentation lasts at most 10 min. Focus on the highlights and special features of the design, and mention the work breakdown and distribution of tasks to team members.\n",
"\n",
"The examination will last about 30 min. After the examination you will be asked to fill in a peer review form. Individual grades are differentiated depending on staff observations and the outcome of the peer review.\n"
]
}
],
"metadata": {
"kernelspec": {
"display_name": "Python 3",
"language": "python",
"name": "python3"
},
"language_info": {
"codemirror_mode": {
"name": "ipython",
"version": 3
},
"file_extension": ".py",
"mimetype": "text/x-python",
"name": "python",
"nbconvert_exporter": "python",
"pygments_lexer": "ipython3",
"version": "3.12.6"
}
},
"nbformat": 4,
"nbformat_minor": 2
}